 Law Enforcement Software
Law Enforcement Software
The status monitors can be configured to use different colors, fonts and type sizes to enhance the readability of the information being presented and to filter out certain types of data allowing you to have multiple monitors where each monitor specific to certain types of information. Each monitor window will initialize to the default setting but can be changed by the user to whatever options are desired. Some configuration settings are specific to the individual monitor window, while other settings are global to all active monitor windows. Here we will discuss where to go and how to configure your status monitors.
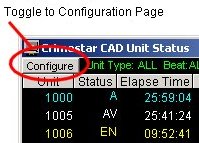
The first step to configuring a status monitor is to toggle the display panel to the configuration page. Click the [Configure] button located in the top left corner of the monitor window. This will cause the monitor display to temporarily change to a configuration page. Note that clicking the [Configure] button will cause the buttons label to change to [Monitor]. You will use this same button to toggle the window back to a status monitor. The unit status monitor and the event status monitor configuration pages have slightly different options, however in both cases the options available on the configuration page of a monitor is specific to that window only.
Unit Status Monitor Configuration - Filters: Form the status monitor configuration page you can set a series of Filters. Monitor filters determines the type of unit that the monitor is to display and optionally only those units that are assigned to a certain beat, sector or district. Filter conditions are always treated as an explicit AND condition. So that when multiple options are selected, the units displayed must meet the criteria specified by each option.
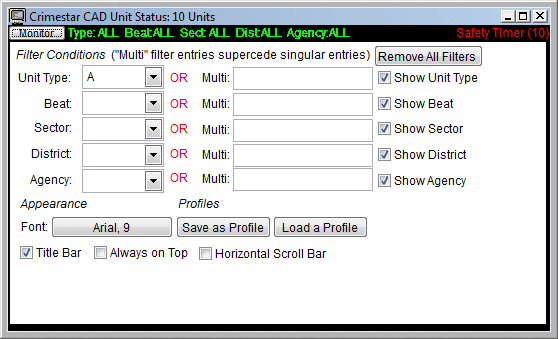
The Unit Type selection can be either All units (A), Police units (P), Fire units (F), Medical-Ambulance (M) or Other Miscellaneous units (O). The Beat, Sector and District fields are open text fields where the dispatcher can enter specific values that correspond to those respective codes. You can also specify Multiple values by typing those same letter codes delimited by a comma in the Multi field.
Filtering not only controls what units are shown in the monitor, it can also control some of the fields shown on the display. Beyond the standard data elements displayed on a unit status monitor, the dispatcher can optionally choose to show the Unit Type, Beat, Sector and District attributes of units.
The “Save Profile” and “Load Profile” buttons can be used to save and restore specific settings of a status monitor to and from a disk file on any given workstation. Saving a status monitor profile using a file name of “DEFAULT” will cause that respective profile to automatically load when the status monitor is first opened.
Event Status Monitor Configuration – Filters: Monitor filters on the event status configuration page determine the type of event that the monitor is to display and optionally only those events that are identified as belonging to a certain beat, sector or district. These filter conditions are always treated as an explicit AND condition. So that when multiple options are selected, the events displayed must meet the criteria specified by each option.
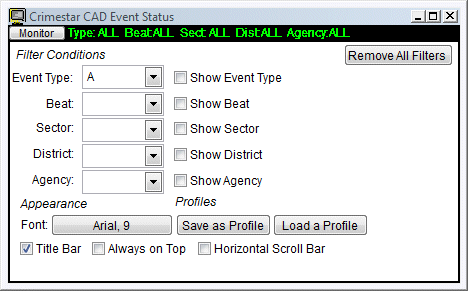
The Event Type selection can be either All events (A), Police events (P), Fire events (F), Medical-Ambulance events (M) or Other Miscellaneous events (O). The Beat, Sector and District fields are open text fields where the dispatcher can enter specific values that correspond to those respective codes. Similar to the functionality of the units status monitor, the dispatcher can optionally choose to show the Event Type, Beat, Sector and District attributes of events.
Depending upon how many units or events you manage via the CAD system, what types of units you manage and how those units are geographically deployed, the ability to create filtered status monitors can be very useful.
The “Save Profile” and “Load Profile” buttons can be used to save and restore specific settings of a status monitor to and from a disk file on any given workstation. Saving a status monitor profile using a file name of “DEFAULT” will cause that respective profile to automatically load when the status monitor is first opened.
Font and Text point size
To change the font or type size of either the Unit or Event status monitor, click the Font button located on the left side of the window to activate a Font selection dialog. Select the Font Type, Size and Style that you wish to use for the monitors display.

Title Bars
To increase the amount of display area available on either the Unit or Event status monitors, you may choose to turn off the Window Title Bar. You can do this by un-checking the “Title Bar” option on the status monitor configuration page. Turning off the title bars disables the ability to move or reposition the windows.
Status Monitor & Form Layering
In a multiple document interface such as presented by Crimestar, it is possible to have multiple forms open at the same time. As a result forms can often be completely or partially layered on top of each other. Understanding and controlling form layering is critical to maintaining fluid and seamless operations within CAD. Usually the most recent form opened will be displayed on top, however, when running CAD from within Crimestar RMS this may not always be true depending on how you configure the CAD forms. The attributes for the CAD Control Panel are that in general it will always remain on top of other forms being displayed. Additionally, status monitor forms may also always be on top of other displayed forms in RMS if either: 1.) The status monitor form is displayed in the Windows desktop rather than within the primary CAD or RMS windows, or 2.) When displayed within the primary RMS or CAD windows the “Always On Top” option in the status monitor’s configuration panel is checked.
Configuring Status Colors
Unlike the configuration items discussed above, the status monitor color and timer attributes are global to all status monitors on the same CAD workstation and cannot be set differently for individual status monitor windows. However, these setting can differ on different CAD workstations. Where multiple CAD workstations are in operation, it is possible to have status colors and safety timers configured differently at each station, however, in the interest of consistency, training and operational ease of use, it is not recommended.
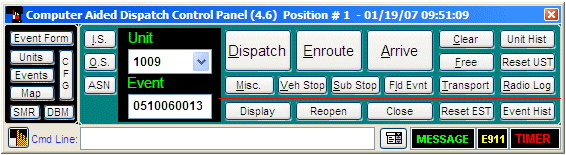
The first step to setting the color and timer attributes for both unit and event status monitors is to activate the Status Monitor Color Configuration window. To activate this window click the “CFG” button located on the left side of the CAD control panel.
The Status Monitor Color Configuration window displays Unit related attributes on the left and event related attributes on the right. For each unit or event, status there is a corresponding command button. The label of that command button reflects the currently selected color attribute for that status. To change a status color attribute, simply click the button, which corresponds to the status you wish to change. Then select your desired color from the color pallet window that is displayed. In addition to status colors the background color can be selected and the alternate background, color used to create a flashing effect when a safety timer expires can also be selected.
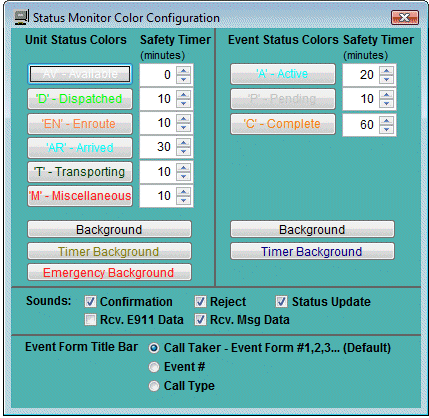
To the immediate right of each respective status is the safety timer value represented in minutes for that status. When a unit first enters a status CAD begins to track the time in status for that unit. When the number of minutes defined via the safety timer for that particular status has elapsed the safety timer alerts the dispatcher by flashing, or more specifically alternating the background color for that unit on the monitor.
At the bottom of the Status Monitor Color Configuration window are checkboxes for activating or deactivating confirmation and reject sounds. These sounds are played whenever a dispatch event or unit transaction is performed successfully (Confirmation) or unsuccessfully (Reject); when a status monitor is updated (Status Update) by another CAD workstation or MDC (Mobile Digital Communicator) unit; when E911 data is received or when an administrative message is received from either another dispatcher or from an MDC equipped field unit.
Restoring the CAD Environment
Using the INI file setting of RESTORE_ENV=ON CAD can, upon close, remember the positions and filtering of all status monitors at a CAD workstation and automatically restore them when CAD restarts on that workstation. THis feature works independent of Status Monitor profiles.