Vehicle Stop
Status Monitor Code: A
One of the most common field activities is a vehicle stop. In CAD, all vehicle stops are event related activities, to which other units can be assigned. However, unlike other status commands that require the event to already exist, the vehicle stop command will automatically create a basic event record using ‘VEHSTOP’ as the designated call type and arrive (A) the unit on that event. Now with the event record created additional responding units (fill or backup units) can also be attached to that vehicle stop via the same event. Sometimes a unit will make a vehicle stop in relation to an event and sometimes a unit will make a vehicle stop that is completely unrelated, while responding to an event. For this reason, when you attempt to place a unit on a vehicle stop status, and that unit is attached to an event, the system will ask you if the unit should be free’d from the current event. If the dispatcher answers yes, the system will free the unit and immediately process the vehicle stop status, creating a new event. If the dispatcher answers no the unit will not be removed from the event it is currently attached to. You can place a unit on a vehicle stop status using any one of the following 5 methods:
-
Select the appropriate unit, and click the ‘Veh Stop’ command button on the CAD Control Panel.
-
Drag and drop the unit from the unit status monitor to the ‘Veh Stop’ command button on the CAD Control Panel.
-
Drag and drop the unit from the CAD map status monitor to the ‘Veh Stop’ command button on the CAD Control Panel.
-
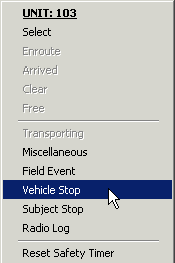
Right mouse click on the unit from the unit status monitor and select ‘Vehicle Stop’ from the popup menu.>>>>>>>
-
Type the following period-delimited command line syntax: VS.UNITID.PLATE.STATE.LOCATION.COMMENT
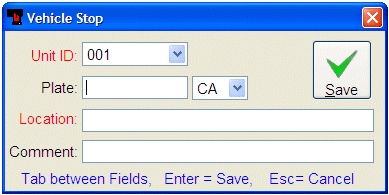
When a unit is placed on a vehicle stop status, using any of the above methods other than the command line syntax the CAD system will prompt the dispatcher to enter vehicle license plate, location and comment. Since this process both creates the event AND attaches a unit to it, the unit initiating the vehicle stop will be automatically Dispatched and Arrived on the newly created event using the same date and time value as was used to create the event itself. Default values for a Vehicle Stop event are Priority=8, Call Source=O (Officer Initiated) and Type of Event=P (Police). The Beat, Sector and District codes will be assigned to the event based upon the values assigned to unit initiating the vehicle stop.
Note that when a vehicle stop command is issued the event is created and sent directly to the event status monitor and NOT to the Call Taker form. This is by design, as we must assume that at the instant the dispatcher was advised of the vehicle stop, he or she may already be busy with another activity/event. Thus, the Vehicle Stop command is designed for an interrupt driven environment.

* This form is optimized for keyboard input. When entering data into this dialog form, use the TAB key to move between fields, ENTER key to save the form and ESC key to cancel form input.
Also, note that the Vehicle Stop command form does not contain information about drivers or other people. Since basic officer safety procedures dictate that a dispatcher be advised of the stop prior to making contact with the driver, the logical sequence of events would dictate that driver information is generally not available when the vehicle stop command is being issued. To enter information about drivers or other people associated with a Vehicle Stop, select and display the Event record and add that information to the comments/description field of the event. Remember: CAD is NOT intended to be used as an RMS. If you wish to enter detailed information about people, it is suggested that you enter it into RMS via the MNI or other appropriate modules.
When the RMS autosearch option is ON (See the appendix on INI File settings) CAD will automatically search the Crimestar RMS BOL file for any BOL record(s) that reference the same license plate and if necessary display a popup warning banner.

