 Law Enforcement Software
Law Enforcement Software
The Enterprise Edition of CrimeStar is designed to be used with a SQL type database. A SQL type database is a product specifically designed for high volume, large scale databases. Due to the true "Client/Server" nature of a SQL type database it is also well suited for Wide Area Networks (WANS). Before the Enterprise Version of CrimeStar can be used it is necessary to build the SQL database. When Crimestar attempts to connect to the SQL database it will use the default TCP/IP Port for SQL Server ( Usually port # 1433 ). If you have multiple instances of SQL running, then each instance will use a different port. When you follow the instructions below to create the Crimestar database, please note the instance (if more than one exists) of SQL that you are using and use the local instance that uses the default port.
Important: Be sure that any routers/firewalls that exist on your network are not blocking the SQL Server access port ( Usually port # 1433 ) or else Crimestar will not be able to properly connect to SQL Server resulting in an error.
*NOTE the Professional Edition of CrimeStar uses "DBF" type database files rather than a SQL Database. Likewise the License Activation key required to run the Enterprise Edition of the software is different than the default EVALUATION key or the key issue to you if you are licensed as a Professional Edition user.
The following Instructions provide a step-by-step description of how to build the SQL database and prepare it for use with Crimestar software using older versions of SQL Server. These instructions refer to Microsoft SQL Server 2000 and SQL Server 2005. It is now recommended that customers use Microsoft SQL Server 2008 or newer whenever possible.
Microsoft SQL Server 2000: (Instructions for Microsoft SQL Server 2005 below)
Step #1: Install
Microsoft SQL Server.
If Microsoft SQL Server is not already installed on your server machine,
you need to install it. Whenever users connect to SQL Server they
must be "authenticated" as a valid user. SQL server can
be configured to authenticate users via either; Windows Authentication
(meaning that it uses the MS Windows client login information to login
to SQL server) or Windows and SQL Server Authentication. Important:
You should select the installation
option that allows for SQL Server authentication,
so that no matter how the user logs in at the MS Windows client machine,
access to the Crimestar database can be made by the Crimestar software
applications.
Step #2: Build the Crimestar Database File.
Once SQL Server is installed and running it is necessary
to build the "Crimestar" database file which will hold all the
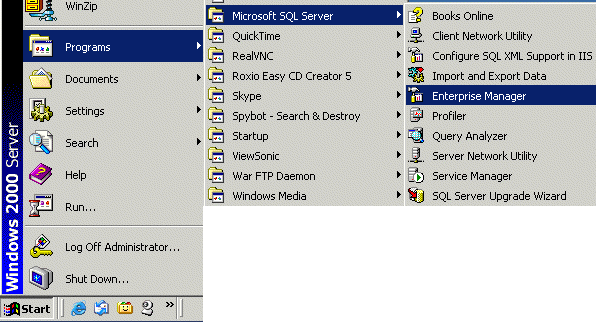
database tables. To do this you must use "Microsoft SQL Server
Enterprise Manager" system administration tools provided with Microsoft
SQL Server. This can be found on your Windows Programs Menu.
When you run the SQL Server Enterprise Manager Application you may be prompted to connect to the SQL Server database engine with a Connect to server dialog screen. When prompted login to SQL Server as the System Administrator ("sa") and supply the appropriate password.
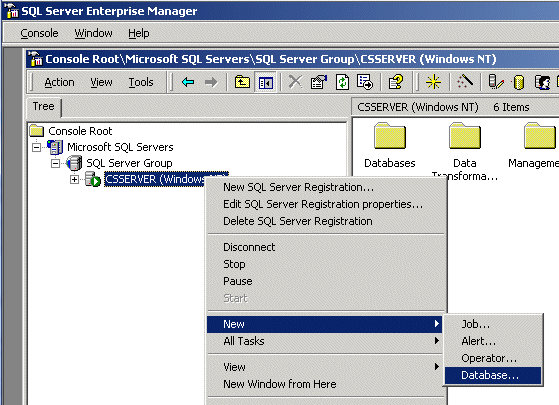
Next you will need to create the "Crimestar" database file within the SQL Server. Within the Microsoft SQL Enterprise Manager application there are several windows. Along the left side you will usually see the "Tree" window showing the Console Root, Microsoft SQL Servers, SQL Server Group and finally the name of your specific SQL Server machine. Now, right-click your mouse over the entry for your specific SQL Server machine to activate a right-click popup menu and select "New" then select "Database..." from the menu.
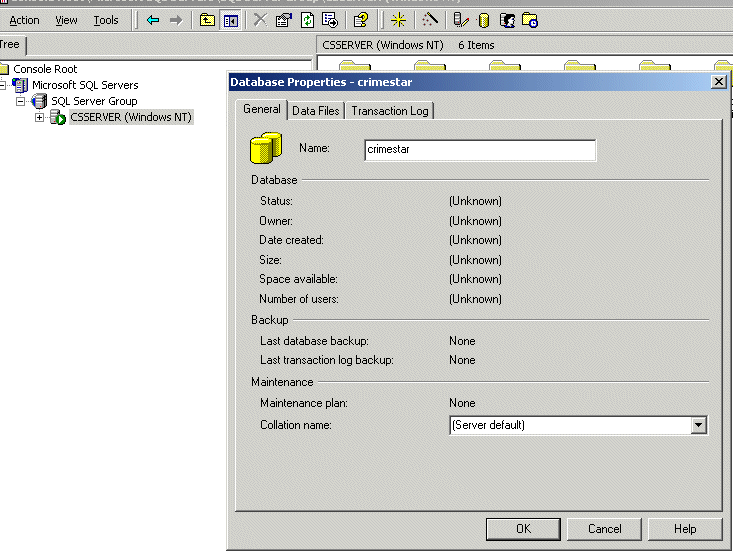
You will then be prompted with a dialog screen that you can use to create the new "Crimestar" database. Enter "Crimestar" in the database name field.
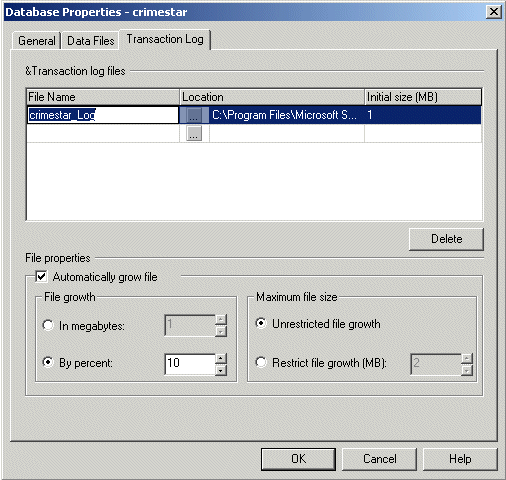
Now, click the page tab for Transaction Log and be sure that the database is set to automatically grow. Choose the rate of growth that you feel comfortable with given your available disk space. Click the "OK" button and the required database files will be created.
Step #3: Build the Crimestar Tables within the Crimestar Database File..
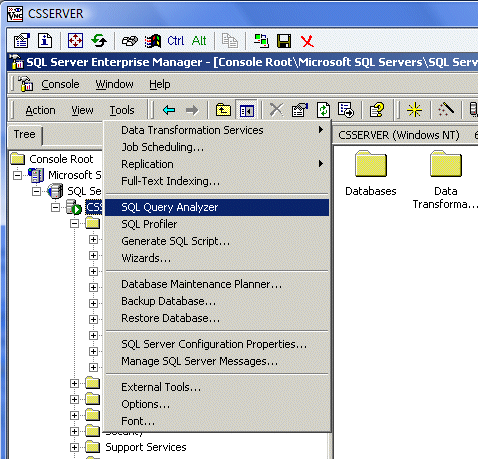
Now that the Crimestar database files are created within the SQL Server, it is necessary to create the actual tables within the database that will hold the data. To do this if is necessary to run the ss7build script file provided as part of the Crimestar installation. To do this you must open the script file in a new query window. Click the "Tools" button from the toolbar to activate the popup menu, then select "SQL Query Analyzer" to open a new query analyzer window.
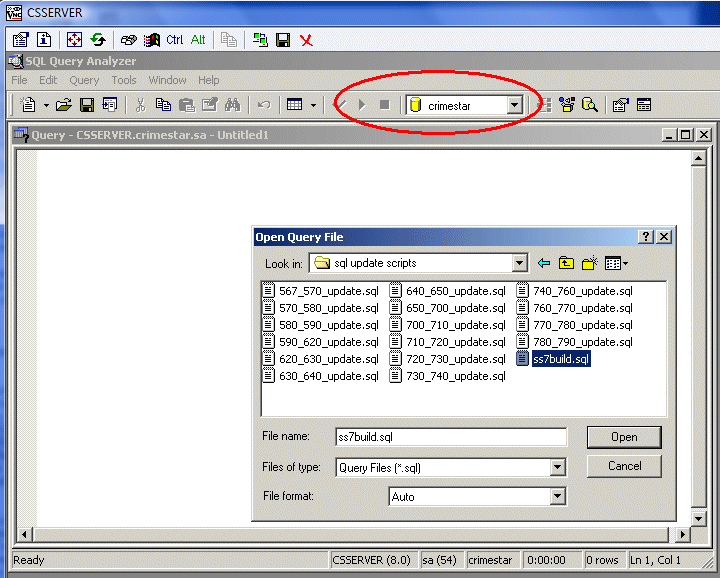
From the Query Analyzer's Query Window click the
"open file" option from the toolbar or choose "File"
then chose "Open" from the main menu. You will then be
prompted with a standard windows file dialog box where you can select
the "ss7build.sql" script file. Also, be sure that the
selected database is "Crimestar" so that the script will run
against the proper database.
You may then be prompted to connect to SQL Server with the Connect to server dialog screen shown in step #2. Login again, if prompted to do so, and you will be given a new query window in the right-hand panel that displays the contents of the ss7build.sql script file. Once the file is being displayed, be sure to check or double-check the database reference on the toolbar and make sure that it is set to "Crimestar". Often times the database reference will revert to "master", which is NOT what you want. If "Crimestar" is not the selected database then the tables will not be built in the proper location. This is very important: MAKE SURE "crimestar" IS THE SELECTED DATABASE. Once the script file is loaded in the Query Analyzer window, click the "Execute Query Button from the toolbar.
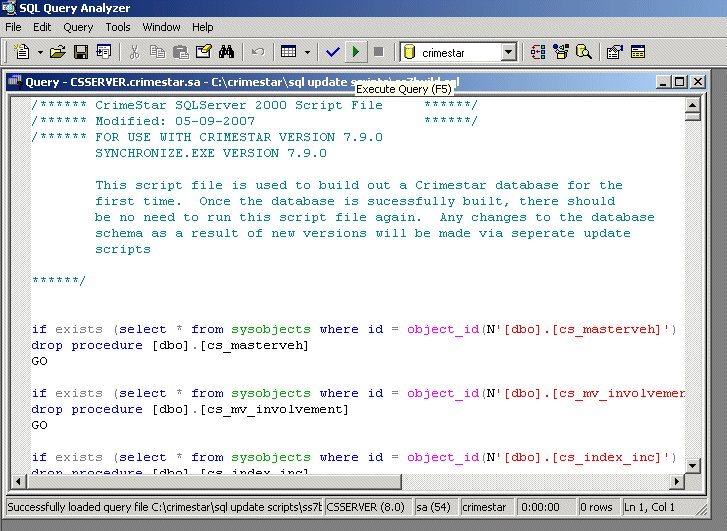
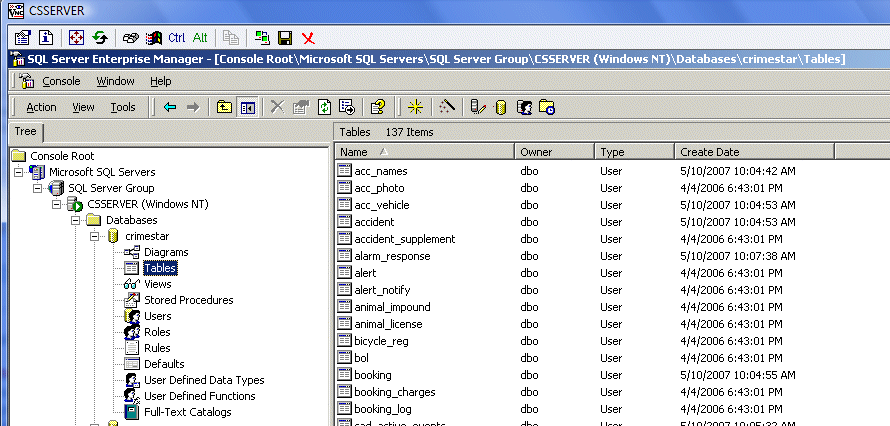
The script file should take a few moments complete depending upon the speed of your respective server machine. The script file should complete without any errors and report "Query executed successfully". Once the query execution is complete the "crimestar" database file within SQL Server will contain the necessary crimestar tables. You may need to refresh the screen by selecting "Refresh" from the "View" option on the main menu before the tables will appear in the "Tables" section of the "crimestar" database as displayed within the Tree of Enterprise Manager.
Now the Crimestar database is ready to be accessed by the Enterprise Edition of the Crimestar program (crimestar.exe) on your respective network client machines.
Step #4: Running Crimestar RMS with an Enterprise Database
Before CrimeStar RMS can be run using the SQL Server database there are a few additional crimestar.ini entries that need to be set. Each of these entries are found in the [CONFIGURATION] section of the Crimestar.ini file. If they do not exist they should be created.
DATABASEMODE=SQL (Normally this would be 'DBF' for the professional edition)
SQL_NAME_IP= [Machine Name or IP Address]
SQL_PACKETSIZE=4096 [4096 is the default for SQL Server, but you might reduce this value to 256 if you run across the Internet]
LICENSE_NAME= [Information found on you License
Activation Key]
LICENSE_COUNT= [Information found
on you License Activation Key]
LICENSE_KEY= [Information found on you
License Activation Key,
This is not the same as the Key issued to you for the professional edition of the program.]
Once the above settings in the INI file have been made you should be able to run the Crimestar.exe file and have it recognize, open and understand the SQL Server database.
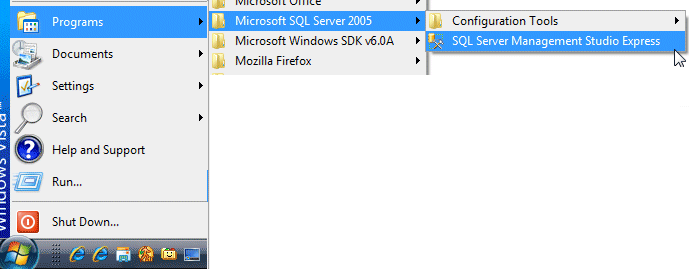
Microsoft SQL Server 2005:
Step #1: Install
Microsoft SQL Server.
If Microsoft SQL Server is not already installed on your server machine,
you need to install it. Whenever users connect to SQL Server they
must be "authenticated" as a valid user. SQL server can
be configured to authenticate users via either; Windows Authentication
(meaning that it uses the MS Windows client login information to login
to SQL server) or Windows and SQL Server Authentication. Whenever
possible you should select the installation option that allows for SQL
Server authentication, so that no matter how the user logs in at
the MS Windows client machine, access to the Crimestar database can be
made by the Crimestar software applications.
Step #2: Build the Crimestar Database
File.
Once SQL Server is installed and running it is necessary to build the "crimestar" database file which will hold all the database tables. To do this you must use "Microsoft SQL Server Management Studio" system administration tools provided with Microsoft SQL Server. This can be found on your Windows Programs Menu.
When you run the SQL Server Management Studio Application you will be prompted to connect to the SQL Server database engine with a Connect to server dialog screen.

The "Server name" displayed will differ depending upon the name
of your respective SQL Server computer. You should then login as
the system administrator using whatever login password you defined when
you installed SQL Server on your computer. In the graphic above
our example server name is "CRIMESTAR\SQLEXPRESS"
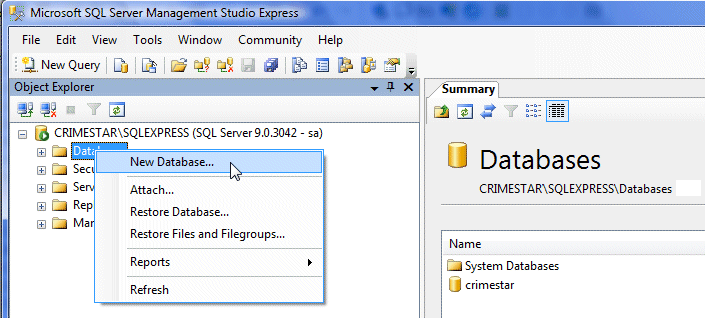
Next you will need to create the "crimestar" database file within the SQL Server. Within the Microsoft SQL Server Management application there are several windows. Along the left side you will usually see the "Object Explorer" window. (If the Object Explorer Window is not visible you can open that window from the "VIEW" pad on the main menu.) Within the object explorer window there is a tree view menu showing the Server name and several folders (Database, Security, Server Objects, Replication, Management) that belong to that respective Server. Now, right-click your mouse over the "Database" folder to activate a right-click popup menu and select "New Database..." from the menu.
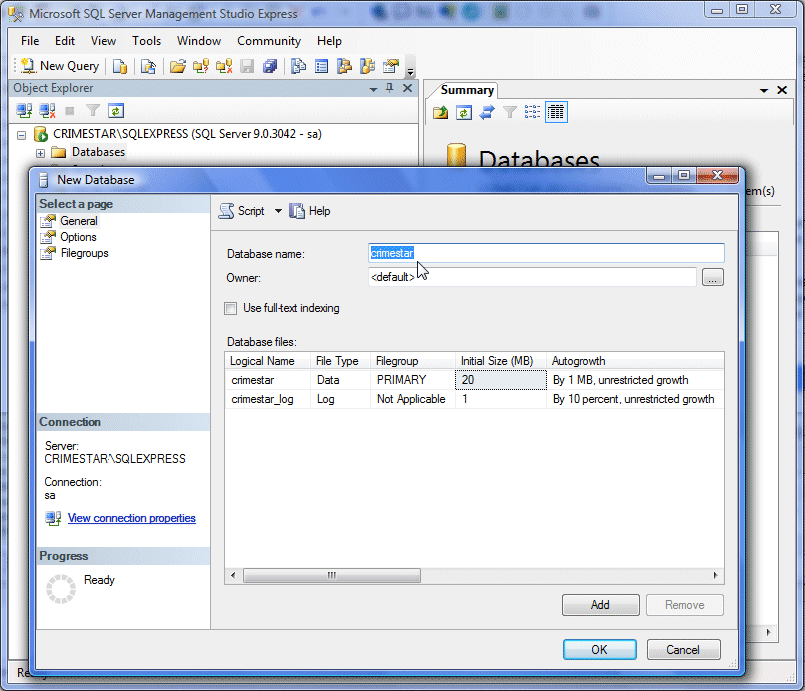
You will then be prompted with a dialog screen that you can use to create the new "crimestar" database. Enter "crimestar" in the database name field. This will automatically reference two associated database files named "crimestar" and "crimestar_log" shown on the same form. You can either accept the defaults or change the initial size of these files, however in almost all cases each file should be set to allow for unrestricted growth. Click the "OK" button and the required database files will be created.
Step #3: Build the Crimestar Tables within the Crimestar Database File..
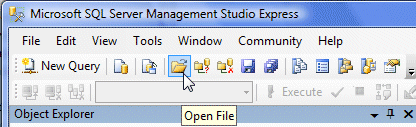
Now that the crimestar database files are created within the SQL Server, it is necessary to create the actual tables within the database that will hold the data. To do this if is necessary to run the ss7build script file provided as part of the Crimestar installation. To do this you must open the script file in a new query window. Click the "Open File" button from the query toolbar to activate the Windows file dialog and select the file.
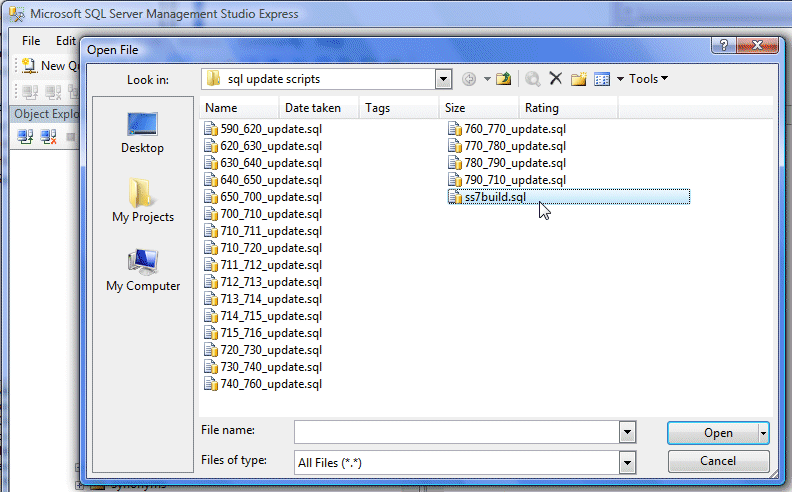
Navigate to the "sql update scripts" folder within the installation folder/directory. The default location would be c:\crimestar\sql update scripts. Now select the "ss7build.sql" script file and either double-click on it or select it and click the "Open" button to load it into the query window. You may be prompted to create a connection
 .
.
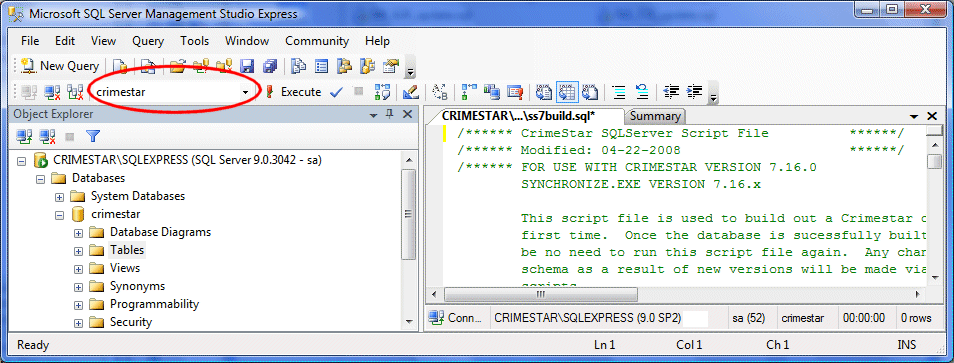
You may then be prompted to connect to SQL Server with the Connect to server dialog screen shown in step #2. Login again, if prompted to do so, and you will be given a new query window in the right-hand panel that displays the contents of the ss7build.sql script file. Once the file is being displayed, be sure to check or double-check the database reference on the toolbar and make sure that it is set to "crimestar". Often times the database reference will revert to "master", which is NOT what you want. If "crimestar" is not the selected database then the tables will not be built in the proper location. This is very important: MAKE SURE "crimestar" IS THE SELECTED DATABASE.
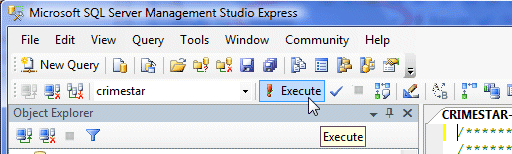
Now click the "Execute" button on the toolbar to run the "ss7build.sql" script file and build the tables within the "crimestar" database container within SQL Server.
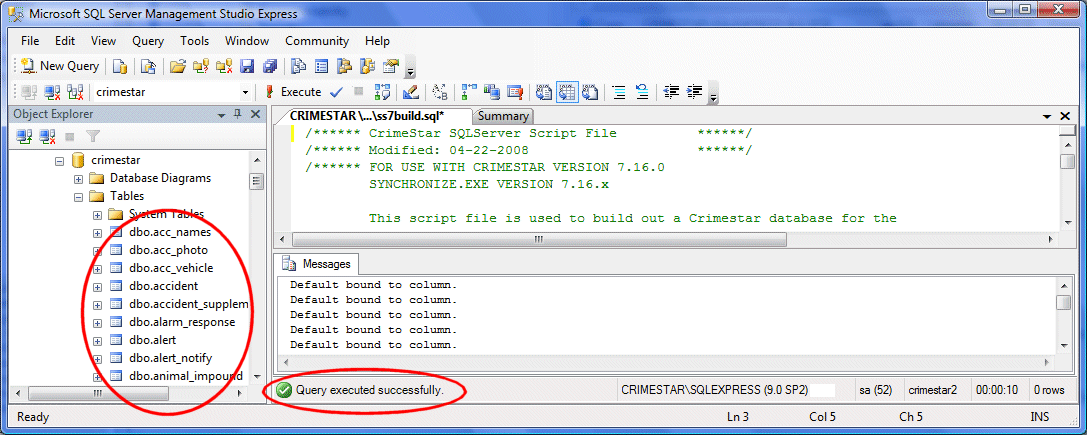
The script file should take a few moments complete depending upon the speed of your respective server machine. The script file should complete without any errors and report "Query executed successfully". Once the query execution is complete the "crimestar" database file within SQL Server will contain the necessary crimestar tables. You may need to refresh the screen by selecting "Refresh" from the "View" option on the main menu before the tables will appear in the "Tables" section of the "crimestar" database as displayed within the Object Explorer.
Now the Crimestar database is ready to be accessed by the Enterprise Edition of the Crimestar program (crimestar.exe) on your respective network client machines.
Step #4: Running Crimestar RMS with an Enterprise Database
Before CrimeStar RMS can be run using the SQL Server database there are a few additional crimestar.ini entries that need to be set. Each of these entries are found in the [CONFIGURATION] section of the Crimestar.ini file. If they do not exist they should be created.
DATABASEMODE=SQL (Normally this would be 'DBF' for the professional edition)
SQL_NAME_IP= [Machine Name or IP Address]
SQL_PACKETSIZE=4096 [4096 is the default for SQL Server, but you might reduce this value to 256 if you run across the Internet]
LICENSE_NAME= [Information found on you License
Activation Key]
LICENSE_COUNT= [Information found on you License Activation Key]
LICENSE_KEY= [Information found on you License Activation Key,
This is not the same as the Key issued to you for the professional edition of the program.]
Once the above settings in the INI file have been made you should be able to run the Crimestar.exe file and have it recognize, open and understand the SQL Server database.